In this post we will take a look at how to integrate camera with our android application. There are two ways in which we can use Camera in our Android application. Android provides you with 2 options while working with Camera
1) Use an existing Camera application
2) Work with Camera hardware API directly
If you are developing a full fledged camera application, then you need to work with the Camera API directly as it gives you more control but it involves a lot more coding. If you just want to integrate the camera with your app, the first option is better and simpler. In this tutorial, we will learn how to use an existing camera app with our application. We will create a simple application that will take pictures and display the same in a ListView. The application will display a Camera button, clicking which will open the existing camera app present on the device. Once the user takes a picture, he will be redirected back to our application and the picture that he has taken will be displayed in a listview and it will be saved to a permanent location.
Getting Started
I am using Eclipse for development however the steps will be similar for other software as well
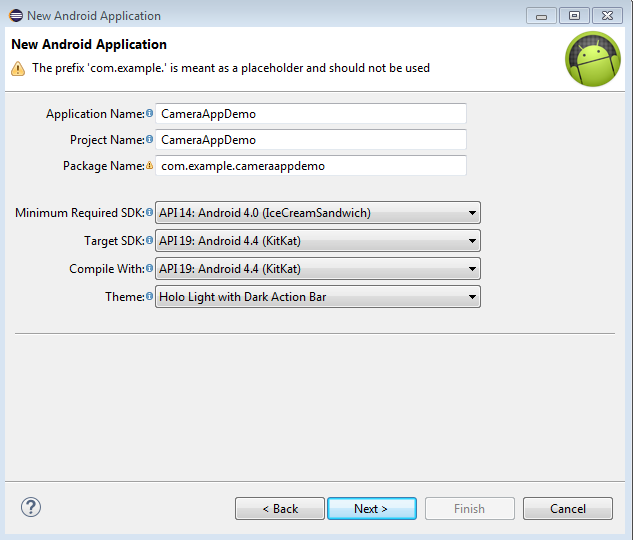
Open Eclipse -> Create a New Android Application project called “CameraAppDemo” with the options as selected below and leave the rest of options as default.
Note: I am currently using Android API 19 but you can target the latest version if you have that installed.
Since we will be displaying the result in a listview, we will add a list view to the activity_main.xml file in the layout folder.
<RelativeLayout xmlns:android="http://schemas.android.com/apk/res/android"
xmlns:tools="http://schemas.android.com/tools"
android:layout_width="match_parent"
android:layout_height="match_parent"
android:paddingBottom="@dimen/activity_vertical_margin"
android:paddingLeft="@dimen/activity_horizontal_margin"
android:paddingRight="@dimen/activity_horizontal_margin"
android:paddingTop="@dimen/activity_vertical_margin"
tools:context="com.example.cameraappdemo.MainActivity" >

<ListView
android:id="@+id/android:list"
android:layout_width="match_parent"
android:layout_height="wrap_content"
android:layout_alignParentLeft="true"
android:layout_alignParentTop="true" >

</ListView>

</RelativeLayout>
Since our main layout contains a list view, it is better to extend our MainActivity class from “ListActivity” instead of Activity as it will be simpler to handle listview events.
public class MainActivity extends ListActivity {
To take a picture, we will display the camera icon in the ActionBar. Modify the main.xml file in the res/menu directory as shown below
<menu xmlns:android="http://schemas.android.com/apk/res/android"
xmlns:tools="http://schemas.android.com/tools"
tools:context="com.example.dailyselfieapp.MainActivity" >

<item
android:id="@+id/action_camera"
android:orderInCategory="100"
android:showAsAction="ifRoom"
android:icon="@drawable/ic_action_camera"
android:title="@string/action_settings"/>

</menu>
You can find the “ic_action_camera” icon inside the drawable folders in the attached solution. On click of the Camera button, the following functions are called
@Override
public boolean onOptionsItemSelected(MenuItem item) {
// Handle action bar item clicks here. The action bar will
// automatically handle clicks on the Home/Up button, so long
// as you specify a parent activity in AndroidManifest.xml.
int id = item.getItemId();
if (id == R.id.action_camera) {
startCapture();
return true;
}
return super.onOptionsItemSelected(item);
}

private void startCapture() {

Intent cameraIntent = new Intent(android.provider.MediaStore.ACTION_IMAGE_CAPTURE);
if (cameraIntent.resolveActivity(getPackageManager()) != null) {

File photoFile = null;
try {
photoFile = CreateImageFile();
} catch (IOException e) {
// TODO Auto-generated catch block
e.printStackTrace();
}

if(photoFile != null)
{
cameraIntent.putExtra(MediaStore.EXTRA_OUTPUT, Uri.fromFile(photoFile));
startActivityForResult(cameraIntent, CAMERA_CAPTURE);
}
}
}

private File CreateImageFile() throws IOException
{
String timeStamp = new SimpleDateFormat("yyyyMMdd_HHmmss").format(new Date());
String imageFileName = "Image_" + timeStamp + "_";

File storageDirectory = getExternalFilesDir("");
File image = File.createTempFile(imageFileName, ".jpg",storageDirectory);
return image;

}
On click of camera button, we call the “StartCapture” function which defines an intent with “android.provider.MediaStore.ACTION_IMAGE_CAPTURE” which specifies that we want to capture an image. This will start the default camera application present on the device.
In the “CreateImageFile()” function, we create an image file which will store the actual image which has been captured. In that method, we first create a file name using the current timestamp. We then specify the directory using the “getExternalFilesDir()“. This method returns a directory which is private to our app. If you want to store the images in the public images directory, you can use the “Environment.getExternalStoragePublicDirectory(Environment.DIRECTORY_PICTURES);” method.
We then pass this extra info along with the intent using “cameraIntent.putExtra(MediaStore.EXTRA_OUTPUT, Uri.fromFile(photoFile));“. This will save the captured image in the following path which we have passed. We then start the activity passing the Intent using “startActivityForResult(cameraIntent, CAMERA_CAPTURE);” . The “CAMERA_CAPTURE” is a integer value which i have used which can be any value.
This will start the camera application. Once you capture an image and confirm, the code will return back to the application and we will handle it in the onActivityResult() method as shown below
@Override
public void onActivityResult(final int requestCode, int resultCode, Intent data) {

switch(requestCode)
{
case CAMERA_CAPTURE:
if(resultCode == RESULT_OK)
{
DisplayImages();
}
break;
}

}

private void DisplayImages() {
// TODO Auto-generated method stub
File myPath = getExternalFilesDir(null);
listOfImages = new ArrayList<String>();

try
{

for(File f: myPath.listFiles()) {
listOfImages.add(f.getAbsolutePath());
}

MyCustomAdapter adapter = new MyCustomAdapter(MainActivity.this,listOfImages);
setListAdapter(adapter);
}
catch(Exception ex)
{
Log.w("Error", ex.getMessage());
}
}
In the function, we check for requestCode and then check if the resultCode is OK. If that is the case, we then call the DisplayImages() function which displays all the captured images in the ListView.
In the “DisplayImages()” function, we again get the path to the storage directory, iterate through the directory and add the AbsolutePath() of all the images in an Arraylist. We then pass that to the CustomAdapter which we have created.
Here is the code for out CustomAdapter layout file.
<?xml version="1.0" encoding="utf-8"?>
<LinearLayout xmlns:android="http://schemas.android.com/apk/res/android"
android:layout_width="match_parent"
android:layout_height="match_parent"
android:orientation="horizontal" >

<ImageView
android:id="@+id/selfie"
android:layout_width="60dp"
android:layout_height="60dp"
android:padding="5dp" />

<LinearLayout android:layout_width="wrap_content"
android:layout_height="wrap_content"
android:orientation="vertical">

<TextView
android:id="@+id/fileName"
android:layout_width="wrap_content"
android:layout_height="wrap_content"
android:text="Medium Text"
android:textAppearance="?android:attr/textAppearanceSmall"
android:layout_marginLeft="10dp"
android:layout_marginTop="5dp"
android:padding="2dp"
android:textColor="#33CC33" />

</LinearLayout>
</LinearLayout>
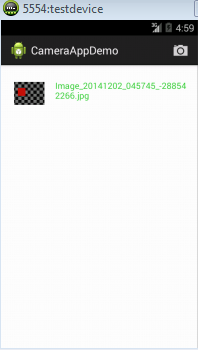
We are using the above layout in our custom adapter for displaying the image along with the file name.
package com.example.cameraappdemo;

import java.io.File;
import java.util.ArrayList;

import android.app.Activity;
import android.graphics.Bitmap;
import android.graphics.BitmapFactory;
import android.view.LayoutInflater;
import android.view.View;
import android.view.ViewGroup;
import android.widget.ArrayAdapter;
import android.widget.ImageView;
import android.widget.TextView;

public class MyCustomAdapter extends ArrayAdapter<String> {

	private final Activity context;

	private final ArrayList<String> listOfImages;

	public MyCustomAdapter(Activity context, ArrayList<String> listOfImages) {
		super(context, R.layout.mylist, listOfImages);
		// TODO Auto-generated constructor stub

		this.context=context;
		this.listOfImages = listOfImages;

	}

	public View getView(int position,View view,ViewGroup parent) {

		ViewHolder holder;

		if(view == null)
		{
		LayoutInflater inflater=context.getLayoutInflater();
		view =inflater.inflate(R.layout.mylist, null,true);

		holder = new ViewHolder();
		holder.imageView = (ImageView) view.findViewById(R.id.selfie);
		holder.txtTitle = (TextView) view.findViewById(R.id.fileName);
		view.setTag(holder);
		}
		else
		{
			holder = (ViewHolder) view.getTag();
		}

		Bitmap bitmap = BitmapFactory.decodeFile(listOfImages.get(position));
		File f = new File(listOfImages.get(position));

		holder.txtTitle.setText(f.getName());
		holder.imageView.setImageBitmap(bitmap);

		return view;

	};
}

 class ViewHolder {
	 TextView txtTitle;
	 ImageView imageView;
}
In the adapter, we are passing an ArrayList containing the path of all the files. In the “GetView()” method, we read the Bitmap from the file location and then display the same in the imageview along with the name of the file.
Now lets write some code that will display the selected image in a popup window when click on any image in the main ListView. Lets create a custom Dialog for the same. Add a new layout file in the res/layout called “cust_dialog.xml“. This will be the layout of our Dialog. The code for which is shown below
<?xml version="1.0" encoding="utf-8"?>
<RelativeLayout xmlns:android="http://schemas.android.com/apk/res/android"
    android:layout_width="fill_parent"
    android:layout_height="fill_parent" >

    <ImageView
        android:id="@+id/image"
        android:layout_width="wrap_content"
        android:layout_height="wrap_content"
        android:layout_marginRight="5dp" />

     <Button
        android:id="@+id/dialogButtonOK"
        android:layout_width="100px"
        android:layout_height="wrap_content"
        android:text=" Close "
        android:layout_marginTop="5dp"
        android:layout_marginRight="5dp"
        android:layout_below="@+id/image"

        />

</RelativeLayout>
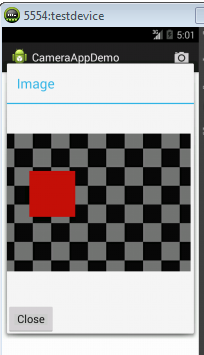
Our custom layout contains an imageview displaying the selected image and a button which will close the dialog.
We will now handle the ListItem Click event in our MainActivity as shown below
@Override
	protected void onListItemClick(ListView l, View v, int position, long id) {
		// TODO Auto-generated method stub
		super.onListItemClick(l, v, position, id);

		// custom dialog
					final Dialog dialog = new Dialog(MainActivity.this);
					dialog.setContentView(R.layout.cust_dialog);
					dialog.setTitle("Image ");

					Bitmap bitmap = BitmapFactory.decodeFile(listOfImages.get(position));

					// set the custom dialog components - text, image and button
					ImageView image = (ImageView) dialog.findViewById(R.id.image);
					image.setImageBitmap(bitmap);

					Button dialogButton = (Button) dialog.findViewById(R.id.dialogButtonOK);
					// if button is clicked, close the custom dialog

					dialogButton.setOnClickListener(new View.OnClickListener() {

						@Override
						public void onClick(View arg0) {

							dialog.dismiss();

						}
					});

					dialog.show();
	}
In the above code, the position will gives us the position of the element which was clicked. We get the absolute path of the selected image from our ‘listOfImages‘ arraylist. We then create the dialog from our custom layout and assign the image in the same.
Below is our complete MainActivity.java code
package com.example.cameraappdemo;

import java.io.File;
import java.io.IOException;
import java.text.SimpleDateFormat;
import java.util.ArrayList;
import java.util.Date;

import android.app.Dialog;
import android.app.ListActivity;
import android.content.Intent;
import android.graphics.Bitmap;
import android.graphics.BitmapFactory;
import android.net.Uri;
import android.os.Bundle;
import android.provider.MediaStore;
import android.util.Log;
import android.view.Menu;
import android.view.MenuItem;
import android.view.View;
import android.widget.Button;
import android.widget.ImageView;
import android.widget.ListView;

public class MainActivity extends ListActivity {

	private static final int CAMERA_CAPTURE = 20;
	ArrayList<String> listOfImages;

	@Override
	protected void onCreate(Bundle savedInstanceState) {
		super.onCreate(savedInstanceState);
		setContentView(R.layout.activity_main);
		DisplayImages();
	}

	@Override
	public boolean onCreateOptionsMenu(Menu menu) {
		// Inflate the menu; this adds items to the action bar if it is present.
		getMenuInflater().inflate(R.menu.main, menu);
		return true;
	}

	@Override
	public boolean onOptionsItemSelected(MenuItem item) {
		// Handle action bar item clicks here. The action bar will
		// automatically handle clicks on the Home/Up button, so long
		// as you specify a parent activity in AndroidManifest.xml.
		int id = item.getItemId();
		if (id == R.id.action_camera) {
			startCapture();
			return true;
		}
		return super.onOptionsItemSelected(item);
	}

	private void startCapture() {

		Intent cameraIntent = new Intent(android.provider.MediaStore.ACTION_IMAGE_CAPTURE);
		 if (cameraIntent.resolveActivity(getPackageManager()) != null) {

			 File photoFile = null;
				try {
					 photoFile = CreateImageFile();
				} catch (IOException e) {
					// TODO Auto-generated catch block
					e.printStackTrace();
				}

				if(photoFile != null)
				{
					cameraIntent.putExtra(MediaStore.EXTRA_OUTPUT, Uri.fromFile(photoFile));
					startActivityForResult(cameraIntent, CAMERA_CAPTURE);
				}
		    }
	}

	private File CreateImageFile() throws IOException
	{
		String timeStamp = new SimpleDateFormat("yyyyMMdd_HHmmss").format(new Date());
		String imageFileName = "Image_" + timeStamp + "_";

		File storageDirectory = getExternalFilesDir("");
		File image = File.createTempFile(imageFileName, ".jpg",storageDirectory);
		return image;

	}

	@Override
	public void onActivityResult(final int requestCode, int resultCode, Intent data) {

		switch(requestCode)
		{
		case CAMERA_CAPTURE:
			if(resultCode == RESULT_OK)
			{
				DisplayImages();
			}
			break;
		}

	}

	private void DisplayImages() {
		// TODO Auto-generated method stub
		File myPath = getExternalFilesDir(null);
		listOfImages = new ArrayList<String>();

         try
         {

		for(File f: myPath.listFiles()) {
			listOfImages.add(f.getAbsolutePath());
		}

		MyCustomAdapter adapter = new MyCustomAdapter(MainActivity.this,listOfImages);
		setListAdapter(adapter);
         }
         catch(Exception ex)
         {
        	 Log.w("Error", ex.getMessage());
         }

	}

	@Override
	protected void onListItemClick(ListView l, View v, int position, long id) {
		// TODO Auto-generated method stub
		super.onListItemClick(l, v, position, id);

		// custom dialog
					final Dialog dialog = new Dialog(MainActivity.this);
					dialog.setContentView(R.layout.cust_dialog);
					dialog.setTitle("Image ");

					Bitmap bitmap = BitmapFactory.decodeFile(listOfImages.get(position));

					// set the custom dialog components - text, image and button
					ImageView image = (ImageView) dialog.findViewById(R.id.image);
					image.setImageBitmap(bitmap);

					Button dialogButton = (Button) dialog.findViewById(R.id.dialogButtonOK);
					// if button is clicked, close the custom dialog

					dialogButton.setOnClickListener(new View.OnClickListener() {

						@Override
						public void onClick(View arg0) {

							dialog.dismiss();

						}
					});

					dialog.show();
	}

}
Below is the screenshot of how our application will behave when running on emulator


